Check 01: Java Installed??
- You can check the JDK is installed by opening a new command line and running the command: javac -version
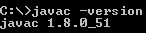 |
| cmd prompt java version |
- This should show you the version number which you downloaded and installed.
Check 02: Eclipse IDE Installed??
- You should be able to download a ZIP file named 'eclipse-java-juno-SR2-win32-x86_64.zip; (the version number 'SR2' may change).
- Inside that ZIP file, there is an 'eclipse' folder which contains all the application files. You can extract the 'eclipse' folder anywhere you want in your system(extract it to your C drive.).
Check 03: Selenium JAR files downloaded??
- You will find client drivers for other languages there, but only choose the one for Java.
 |
| Selenium JAR files from seleniumhq.org |
- This download comes as a ZIP file named 'selenium-2.46.0.zip'. Extract the contents of this ZIP file on your C drive so that you would have the directory 'C:\selenium-2.46.0\'.
- This directory contains all the JAR files that we would later import on Eclipse IDE.
Check 04: Eclipse configured with WebDriver??
- Launch the eclipse IDE using “eclipse.exe” residing inside the eclipse folder.
- When asked to select for a workspace, accept the default location and click OK.
 |
| Select Eclipse workspace |
- In Eclipse IDE, create a new java project goto File => New => Java Project.
 |
| Select Java project |
- Provide a name to your Java Project. Let us provide the name as 'Learning_WebDriver' and Click on the Finish Button. The newly created project can be viewed at the left side of the screen in the package explorer panel.
- Create new Java class. Let us provide the name as 'First_WebdriverClass' under the source folder by right clicking on it and navigating to New => class.
 |
| Create Java class |
Check 05: Let's Begin:
Now that we have our project set up, let's start writing some WebDriver script!


No comments:
Post a Comment