Monday, October 29, 2018

Tuesday, July 21, 2015

WebDriver Interface : Concept Behind Invoking Browser


 In this blog I will explain the interface concept of Java in Selenium WebDriver.

WebDriver Interface Concept 

Let's assume that we are automating a web based application, the first step which comes to mind is How could we invoke the browser? right??

Let us see how to invoke a browser with the help of Selenium WebDriver and understand the concept behind it.

What is an Interface?

  • Interface is like a blueprint of class. It defines a set of methods but does not implement them.
  • Classes will implement the Methods present in an interface.
OOP concept
  • Interface will create Rules To Follow structure for class where It Is Implemented. This way, If you look at the code of Interface, You can get Idea about your program business logic.

Yes, WebDriver Is an Interface

Since, WebDriver is an interface we need a Class to implement the Methods in it. 

Question: What are the classes we need to implement the methods in WebDriver?
Answer: Below are all known Implementing Classes:
ChromeDriver, EventFiringWebDriver, FirefoxDriver, HtmlUnitDriver,InternetExplorerDriver, MarionetteDriver, OperaDriver, RemoteWebDriver, SafariDriver

The question then arises: What Class should I Select?
Answer: It depends on your choice of browser in which you want to execute your test cases.

for example: If you want to execute your test cases in Firefox browser you should select FirefoxDriver Class and for Chrome browser you should select ChromeDriver Class and likewise for other browsers.

FireFox class where WebDriver Interface is implemented

Therefore, let's write our first step to Invoke a Firefox browser keeping this concept in mind.

Steps to invoke Firefox browser: 
  1. Choose the browser(Firefox) on which you want perform automation and select the respective class to implement WebDriver.
  2. Create an object for the class and assign a name to it
             driver = new FirefoxDriver();

     3.  Reference class object to WebDriver interface.

             WebDriver driver = new FirefoxDriver();

Run this code in Eclipse to invoke the Firefox browser.

 import org.openqa.selenium.WebDriver;  
 import org.openqa.selenium.firefox.FirefoxDriver;  
 public class First_WebdriverClass {  
      public static void main(String[] args) {  
   WebDriver driver = new FirefoxDriver();  
      }  
 }  
Now we know the concept behind invoking the browser using WebDriver. Let me know in case of any issue.

Thursday, July 16, 2015

Before we get started with WebDriver scripting using Java and Eclipse


Check 01: Java Installed??

  • You can check the JDK is installed by opening a new command line and running the command: javac -version

         
             cmd prompt java version
  • This should show you the version number which you downloaded and installed.

Check 02: Eclipse IDE Installed??
  • You should be able to download a ZIP file named 'eclipse-java-juno-SR2-win32-x86_64.zip; (the version number 'SR2' may change).
  • Inside that ZIP file, there is an 'eclipse' folder which contains all the application files. You can extract the 'eclipse' folder anywhere you want in your system(extract it to your C drive.).
Check 03: Selenium JAR files downloaded??
  • You will find client drivers for other languages there, but only choose the one for Java.
Selenium JAR files from seleniumhq.org
  • This download comes as a ZIP file named 'selenium-2.46.0.zip'. Extract the contents of this ZIP file on your C drive so that you would have the directory 'C:\selenium-2.46.0\'. 
  • This directory contains all the JAR files that we would later import on Eclipse IDE.
Check 04: Eclipse configured with WebDriver??
  • Launch the eclipse IDE using “eclipse.exe” residing inside the eclipse folder.
  • When asked to select for a workspace, accept the default location and click OK.
Select Eclipse workspace
  • In Eclipse IDE, create a new java project goto File => New => Java Project.
Select Java project
  • Provide a name to your Java Project. Let us provide the name as 'Learning_WebDriver' and Click on the Finish Button. The newly created project can be viewed at the left side of the screen in the package explorer panel.
  • Create new Java class. Let us provide the name as 'First_WebdriverClass' under the source folder by right clicking on it and navigating to New => class.
Create Java class
  • Now let us configure the libraries into our Java project. For this, select the project and Right click on it. Select 'Properties' within the listed options. The following screen appears, Select 'Java Build Path' from the options.
Adding Selenium JAR files to library
  • 'Libraries' tab is opened,. If not, click on the 'Libraries' tab. Then, click on the 'Add External Jars…' button. Browse to the location where we have saved the extracted folder for Java Client Libraries.
  • Navigate to C:\selenium-2.46.0\ (or any other location where you saved the extracted contents of 'selenium-2.46.0.zip').Add all the JAR files inside and outside the 'libs' folder. Your Properties dialog should now look similar to the image below.
External JAR files added
  • Click 'OK', the project will look like the following image.
The project


Check 05: Let's Begin:

Now that we have our project set up, let's start writing some WebDriver script! 


Friday, July 10, 2015

Understanding Selenium Migration: Part II


Hello and Welcome to part II of Understanding Selenium Migration


Selenium 1 => Selenium 2


Let's continue...

With number of issues popping up due to limitations of Selenium 1, there was a scope for another browser automation framework: WebDriver

Simon Stewart while working for ThoughtWorks wanted to try a different approach to drive the browser.Therefore, he started working on WebDriver project.It started originally as a way to drive HTMLUnit and Internet Explorer but having learnt lessons from Selenium 1,Simon was able to design the API to fit in with the way most developers think and it was a welcome change.

When WebDriver was released there were notable differences between it and Selenium 1, though they were from same software clan of an API for browser automation. Selenium 1, which was written purely in JavaScript for all the browser automation, would automate the browser from within the browser. On the other hand WebDriver tries to control the browser from outside the browser. It uses accessibility API to drive the browser. The accessibility API is used by a number of applications for accessing and controlling applications when they are used by disabled users and is common to web browsers.

Amalgamation of two projects:

Both Simon Stewart and Jason Huggins thought that it would be a really good idea to merge the two projects together. In August, 2009, it was announced that the two projects would merge.This was then called Selenium 2 or Selenium WebDriver or WebDriver.

Now that we know the history of its birth, let's understand the design and architecture of Selenium 2.

Design and Architecture of Selenium 2:

Selenium 2 Design:

Design of WebDriver API is 'object-based'( OOPs, Don't worry. We will get a hang of it when we start scripting).It uses accessibility API to drive the browser. The accessibility API is used by a number of applications for accessing and controlling applications when they are used by disabled users and is common to web browsers.
WebDriver uses the most appropriate way to access the accessibility API. If we look at Firefox, it uses JavaScript to access the API. If we look at Internet Explorer, it uses C++. This approach means we can control browsers in the best possible way.

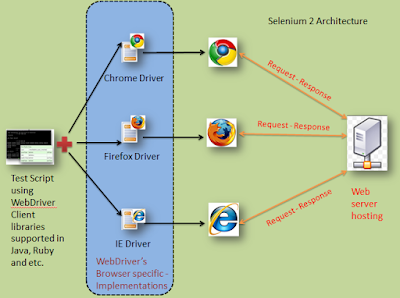
Selenium 2 Architecture:


Selenium 2 simplified architectural representation

Architecture representation explained!!


1. By using the language-binding client libraries, one can invoke the browser-specific implementations of WebDriver, such as Firefox Driver, IE Driver, Chrome Driver, and so on to interact with the AUT on the respective browser. These browser-specific implementations of WebDriver will work with the browser natively and execute commands from outside the browser to simulate exactly how the application user does.
2.  After execution, WebDriver will send out the test result back to the test script for developer's analysis. 


Now that we know the basics of how it all hangs together, lets have a quick look at the differences in next blog.

Selenium 3 is coming...

Thursday, July 9, 2015

Understanding Selenium Migration: Part I

Selenium 1 => Selenium 2

Some are drawn to new places by 'pull ' factors, others find it difficult to remain where they are and migrate because of 'push' factors. Let's evaluate the 'pull' and 'push' factors and understand why we migrated to selenium 2.

So lets get on with part I...

Selenium 1 or Selenium Remote Control or Selenium RC :

Selenium RC is a popular UI automation library, allowing developers and testers to automate their interactions with a Web based Application Under Test (WAUT) by providing them with the necessary libraries, supported in multiple languages,to program.

Patrick Lightbody and Paul Hammant created Selenium Remote Control using Java as a web server that would proxy traffic. It would inject selenium onto the page and then it would be used in a similar manner as to what it was in the three column manner.

Design and Architecture of Selenium 1:

Selenium 1 Design: 

Selenium 1 design was such that it used generic JavaScript named Selenium Core to drive the WAUT on a browser. But to use generic JavaScript that can drive the WAUT on any browser, first it should comply with a security policy named Same-Origin Policy. Every available browser in the market imposes this policy on the websites that are loaded on it.

Before moving on to the architecture, let me shed some light on Same-Origin Policy

To understand this policy, lets do a deep dive on how a browser executes JavaScript loaded from a website.

For every website that is loaded on it, the browser creates a separate sandbox for the website's JavaScript, which restricts the JavaScript to be executed only on it's respective website domain. This way, a JavaScript that belongs to one website doesn't execute on another website that is currently loaded on that browser. This security vulnerability, named Cross-site scripting, is the browser's responsibility to restrict.
The Same Origin policy allows one window to access properties or functions of another one only if they come from same protocol, same port, same domain.

How did Selenium 1 or Selenium Remote Control or Selenium RC handled it?

To overcome this security restriction,Selenium RC acts as an HTTP Proxy Server. When the test script asks to launch a browser, Selenium RC server launches the browser and injects its JavaScript(Selenium Core) into the browser. All the subsequent requests for the WAUT go through Selenium RC (acting as an HTTP Proxy Server) to the actual web server hosting WAUT. Thus making the browser think that the web application is being served from the Selenium RC's server domain than the actual web server's domain and allowing Selenium Core to execute and drive the web application.

Selenium 1 Architecture: 


Selenium 1 simplified architectural representation

With the move to mobile devices and HTML5, Selenium RC started showing that it wasn't able to fulfill its original requirement i.e browser automation to mimic what the user is doing.

Selenium 2 is born, in part II we will understand how and why...